
My daughters and I love obstacle courses and to run, jump and climb, so, I wondered how to build a backyard ninja warrior course.
A backyard ninja warrior course will include age-appropriate obstacles both homemade and purchased, but ideally items that can be adjusted for height & weight. Salmon ladders, quad steps, slacklines, rope tunnels & a warped wall all make great additions to your backyard ninja obstacle course.
Building a backyard ninja warrior course is a great way to get your little ninjas active and having fun. It’s an obstacle race that can be tailored to any age or skill level.
You can create an epic obstacle course with a variety of obstacles that will challenge your little ninjas and keep them entertained for hours. From monkey bars to cargo nets, there are so many types of obstacles you can include in your backyard obstacle course.
With a little bit of creativity, you can build an amazing ninja warrior course that will provide much fun for the whole family.
The first thing is to think about the age of the kids that will be using it. But then also consider how they will grow into the course. So let their age be your guiding force.
Then think about the layout of the obstacles as well as the size of the obstacles in relation to the size of your yard. Lastly, think about storage for any pieces that won’t be left outside all the time.
Let’s dive into the details!
Parkour vault
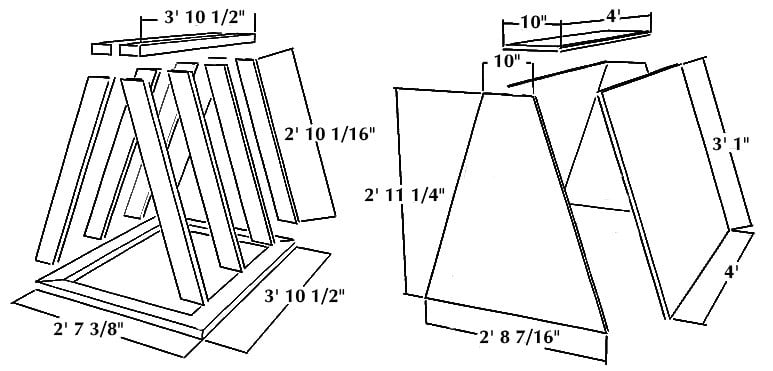

A parkour vault is typically made from 2×4’s and plywood and designed to be jumped off of or over. First, build a long triangle with 2×4’s and then cover it with plywood. You can add foam padding for a layer of protection.
The diagram above gives you a good idea.
A vault is a great addition to your backyard ninja warrior course. It can be climbed over or, as the kids get older and more skilled, it can be jumped over. At my martial arts school, we have a 3 level padded vault.
The benefits are it’s soft and we can adjust the height to fit the age of the class.
The downsides are the velcro attachments don’t hold up well (but we also have 400 students). I also wouldn’t store them outside and for a backyard ninja warrior course, I would ideally get something really heavy or something that can be staked into the ground to keep it from moving.
Check out the padded vaults we got at Amazon (click to check current prices) if you’re interested, as it is well-reviewed and is great for adjusting for 3-4-year-olds. It would work great inside too (especially on carpet).
Above is a basic design for making one out of plywood sheets and 2x4s that should be very sturdy and solid and hold up nicely. If you are storing it permanently outside, make sure and paint, stain, or otherwise seal it so it will last a while.
@JESSIEgraffPWR @americanninjawa we have a mini #ninja coming your way in a few years. One warped wall down. pic.twitter.com/4J8yyfPcf4
— Timothy Imholt (@TimothyImholt) February 18, 2017
Warped wall
A warped wall is a tall wall that curves inward and then back out again at the top. It is designed to run up and then pulling yourself up to the top of it before you start to slide back down. Often these are 12′, 16′ or even taller.
Building a warped wall is a pretty advanced woodworking job, so unless you’re a professional craftsman, you may want to skip this one.
But for little kids, you could totally make a 4′ one just for fun! You could also take an easier route and simply build (or get) a ramp to run up since a warped wall would typically require you to soak your sheets of plywood to make them more bendable.
This is one of the most impressive climbing obstacles and is perfect for older teens. You do need plenty of outdoor space too since you have to get a running start.
But here are some decent instructions on Pinterest that can get you going!

What is a salmon ladder?
A salmon ladder is a set of verticle pull-up bars where you jump up a level each time you pull up. It is frequently featured on the TV shows American Ninja Warrior and Arrow.
It’s called a salmon ladder because you are figuratively swimming upstream.
ANW Season 7 challenger J.J. Woods goes on to say “You’re exploding your body up, extending your arms so that you can reach the next rung, and carrying your body weight up with your knees. In between rungs, you reach a moment of zero gravity where your body is almost weightless—I practice by doing explosive clapping pull-ups to simulate the motion.”
He also gives some great advice in “Don’t aim for the next pegs. Aim for the base of the ones on top of that, to give yourself a few inches of room just in case.”
Personally, if you have some really athletic preteens, your own salmon ladder would be a great obstacle to add.
How to build a salmon ladder
To build a salmon ladder, first, bury two 4×4 posts in the ground 42″ apart, ideally in concrete, at least 1-2 feet deep. Then attach salmon ladder rungs on each post level with one another every 12 inches. Get a steel bar that is at least 44″ wide to use for the crossbar.
Because of the force of your body weight coming back down onto the rungs of the salmon ladder, this thing needs to be sturdy.
The design is fairly simple:
- 2 wooden 4×4 posts (anywhere from 12′ to 16′ long) that you bury in the ground 1-2′ deep (in concrete is ideal)
- A 2×6 crossbar between the 2 posts at the top
- The two 4×4 posts are 42″ apart and the crossbar lines up with the outer edges of each
- A series of ladder rungs angled upwards every 12″
Build the ladder before placing in the ground.
Then get a galvanized conduit pipe from the electrical or plumbing section of Home Depot or Lowes to use as your climbing bar. Since the ladder is 42″ wide, to avoid the bar slipping off, get one that is at least 44″ if not even wider and, of course, use caution when using.
Make this even easier by getting a steel salmon ladder from Amazon (click to see current price) that would simply screw into your 4×4 posts.
Great reviews and a lot easier to install than cutting wood at an angle and trying to get them mounted evenly.
Old tires make great obstacles!
Visit local junkyards or tire shops and get some old tires to make great obstacles to jump on and in.
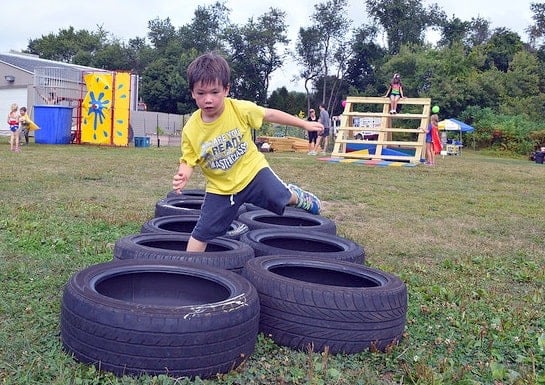

A tire jump is honestly the easiest, cheapest, but still very cool backyard ninja obstacle to do.
If you can get at least 8, place them side by side as seen in the pic and they are great to jump either into or on top of.
If one ever wears out, just get another one the same way. This is great for building agility, coordination, and focus.
You could also get larger tires, stand them up on end flat against each other and attach them to each other for a crawling tunnel.
Quad steps
Quad steps (or quint or quintuple steps if you’re building 5) seem simple enough, but they’re great for developing coordination, balance, focus, and timing.
Essentially, you’re building a rectangular wooden table with only 2 legs instead of 4. Thus it lays down on the side without legs at an angle. Then you’ll place at least 2 of them in a row facing opposite each other, slightly offset.
To make 4 of them, you’ll need 2 sheets of 4’x8′ plywood (which is actually enough to make 6). Get plywood at least 3/4″ thick.
Cut the plywood and 2x4s
With a handy circular saw, cut out sections that are 35″ x 30″
Then you’ll need three 2x4s that are 8 feet long. With the plywood rectangles flat on the ground, cut the 2x4s to frame the edges of the plywood.
Cut a 2×4 to where you have 2 pieces that are 30″ long and place them at the top and bottom on the shorter sides. Then cut 3 pieces that are 29″ long that run the opposite direction inside the 2 end pieces (2 outer and 1 in the middle).
With a drill and some deck screws, screw all the 2x4s into each other. For now, we are not screwing them into the plywood.
Flip everything over, line up the plywood with the 2x4s and screw the plywood to the 2x4s about 1 screw every 10″ or so.
Attaching the feet to the base
Now you just have to build the feet that extend on one side.
Cut a 2×4 to have 2 pieces 37″ long and 1 that is 24″ long. The 24″ piece runs between the 2 longer ones about 8″ from one end (so you’ll end up with an odd-shaped “H”).
With your plywood and 2×4 base upside down and on a flat surface, place the H-shaped brace standing up at one end of the base. It doesn’t matter which end you place it, but the end of the brace with the cross brace 8″ from the bottom should be at the end away from the base.
Then just screw in the brace from the outside of the 2×4 frame using 2 screws on each side.
Build at least 3 of these or 5 or more for great fun! For better weatherproofing, make sure and use some wood stain or sealer on them unless you plan to bring them inside when not in use.
Balance beams
Balance beams are an essential part of any ninja course.
They require the participant to maintain their balance while walking or running across the beam. To build a balance beam, you’ll need some basic materials such as pressure-treated lumber, screws, and a cordless drill. Start with a 4×4 wooden post; ideally 8 to 12 feet in length.
Then cut a 2×6″ piece of lumber into small rectangles 8-10″ in length.
Place a cut 2×6 every 4 feet, with one at each end. Simply use wood screws to drill them into the bottom of the 4×4. The 2×6 pieces will essentially act as feet and be under the 4×4 beam.
Finally, add some padding around the edges of the platform for extra comfort and safety.
Once your balance beam is complete, you can add other obstacles such as monkey bars or cargo nets to your backyard ninja warrior course. You can also add a finish line at the end of your course so participants know when they’ve completed it successfully!
Building a backyard ninja warrior course is a great idea for active kids who want to stay fit and have fun at the same time!
Tree trunks
Jumping from one tree trunk to another is fun; especially when they aren’t exactly the same height.
The ideal tree trunk would be anywhere from 8″ in height, to 1′ or even 1.5′ tall. Anything over that would likely topple over (which could add to the fun with older kids).
But you could also screw them into a piece of plywood to ensure they stay upright. 4-6 of these in a row, spaced out about 18-24″ (depending on the age of the kids) should be perfect.
Awesome Prebuilt obstacles on Amazon
Of course, since Amazon rules the world, you can buy a number of premade obstacles there and many of those are well-made and well-priced.
Here are my personal recommendations based on what obstacles I know work well at the martial arts school I help run in conjunction with scouring reviews on Amazon:
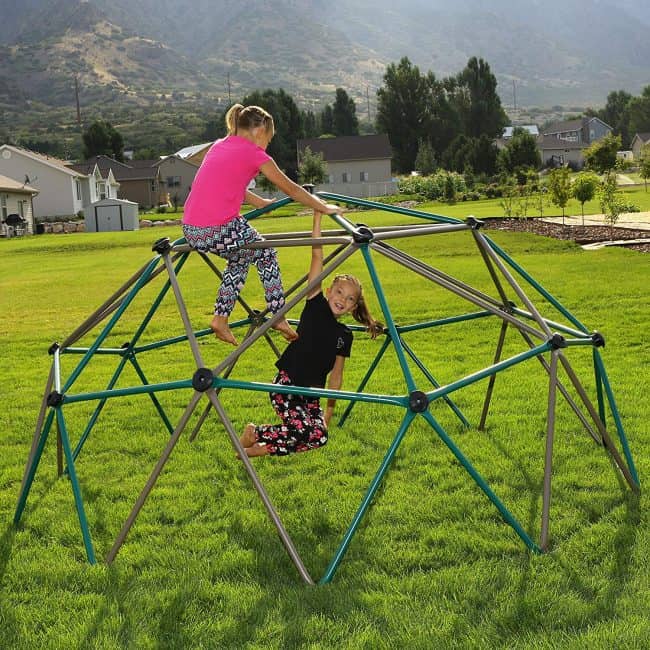
1. Lifetime Geometric Climbing Dome
This is great for kids ages 3-10 and works well right in the middle of your course to climb over or through. Heavy-duty steel and weather & rust-resistant.
Great reviews on Amazon and free shipping.
CLICK HERE to see the current price and more info on Amazon

2. Ninja Warrior Obstacle Course for Kids


I have one of these slack lines in my yard (granted I put it up towards the end of fall so my daughters haven’t used it much).
It’s 50′ long and I have mine tied between 2 trees. This comes with tree protectors and 10 different accessories. Perfect for ages 5 and up and also has great reviews on Amazon and comes with Prime 2 day free shipping.
CLICK HERE to see the current price and more info on Amazon
3. Fong Climbing Cargo Net
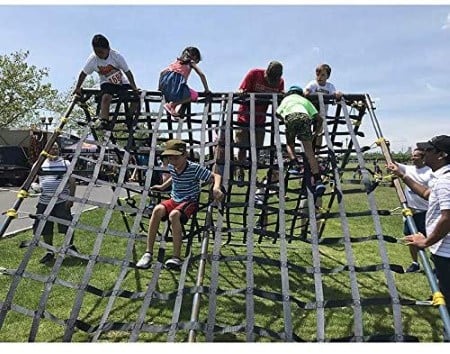
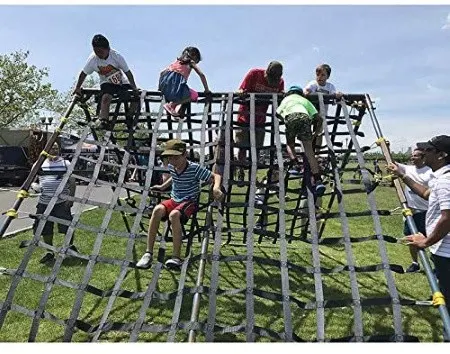
No ninja obstacle course is complete without a net ladder to climb on or over.
Like my other recommendations, this too comes with great reviews and free Prime shipping on Amazon.
Weight capacity of 1000 pounds so it’s perfect for kids and adults. You will need to build the support frame for it or attach it to another part of your course.
CLICK HERE to see the current price and more info on Amazon
4. Spider Web Tree Swing
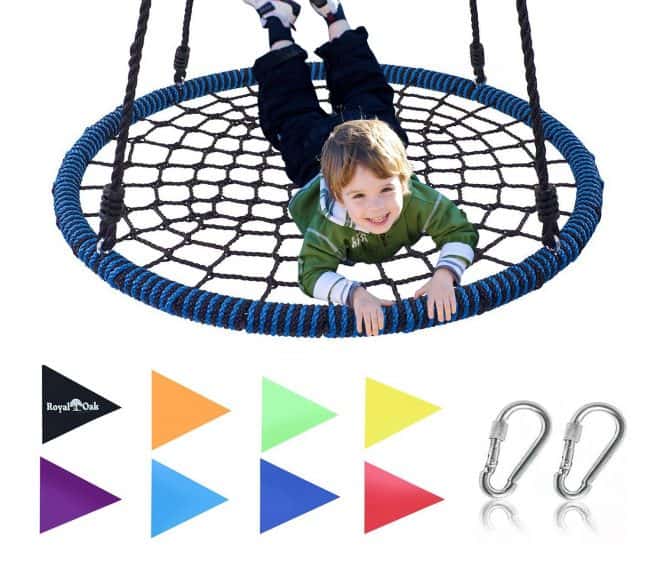

This swing makes a great transition from the ninja net to ninja line obstacle course, but really, it would fit in anywhere.
Great reviews and free Prime shipping like almost everything I’ve ever recommended.
Hang from a tree branch or swing set and goes up in seconds. I have 2 of these and I literally hung it in under 5 minutes with no tools needed other than I used a ladder to get it up and over the tree branches.
CLICK HERE to see the current price and more info on Amazon
Frequently Asked Questions
What is a backyard ninja warrior course?
A backyard ninja warrior course is simply an obstacle course you build in your backyard for children to play on. It could include rope nets, balance beams, quad steps, slacklines, or more challenging obstacles such as a salmon ladder or warped wall.
While traditional playscapes, slides, and swing sets are great, for more adventurous kids, there’s simply nothing better than a great obstacle course to play on.
Traditionally they might include:
- A rope net to climb up and over
- Balance beams
- A salmon ladder
- A warped wall
- Quad or quint steps
- Jungle gyms
- Slacklines (where objects to hang on to are suspended from a rope tied between two posts or trees)
Don’t worry; we’ll get into all of that below so you can get started building yours today!
Of course, the term “ninja warrior” refers to the popular TV show American Ninja Warrior, but you don’t have to spend a fortune on yours or make yours that challenging.
Kids naturally love to run, jump, climb, and swing, so learning how to build a backyard ninja warrior course will be something they will treasure (and use) for years to come.
How much does it cost to build a ninja warrior course?
The cost to build a backyard ninja warrior course will average about $500. Buying premade items will make it easier to put together, but will increase the cost.
Of course, professional ninja warrior gyms spend anywhere from $50,000 to $250,000 to outfit an obstacle course worthy of American Ninja Warrior athletes.
If you have older kids who want bigger challenges you could find yourself spending closer to $900. And if you have little kids, they’ll be happy with something that costs around $200.
Ideally, though, spend somewhere in the middle and build something you can grow and expand as your kids get bigger.
What is the best age for kids to do obstacles?
Between the age of 2 and 3 is the best age to start kids on obstacle courses. Start with small obstacles that increase in complexity as their strength, coordination, and flexibility improve.
Since I have a toddler in the house, but also 2 teens, I’m in a pretty good position to give you some great insight here. I also helped run a martial arts school for over 7 years where we regularly built obstacle courses.
Starting around 12 months, kids begin to walk and work their way up to running, often by 18 months.
Of course, there’s a lot of falling involved in the learning process. But it’s important that we, as parents, allow some of that to develop their confidence, resilience, and the ability to learn from their mistakes.
By the time they are between 2-3, your kids will start to crawl through tunnels, run, jump, and climb over and under obstacles. Once they turn 3, children start to get a whole lot better at running, jumping, and turning as coordination improves.
By the time they’re 5, they’re starting to master their own space, and are learning how not to bump into objects and others when running and climbing.
As they get older still, their skills in skipping, hopping, sliding, and things like spatial awareness are all improving dramatically.
All that is to say, that learning how to build a backyard ninja warrior course can really happen at almost anytime time once your child is walking.
Start with some fun, simple, and small obstacles. You can use simple household items for this like jump ropes and hula hoops.
Once they are 4-5 they’ll be ready for a full-blown obstacle course. Then you’ll just keep expanding it as they get older.


What are the best types of obstacles for 5-7-year-olds?
The best obstacles for 5-7-year-olds will include balance beams, monkey bars, and ramps to run up and jump from. But ideally, look for modular pieces that can be made bigger and more challenging as they get older and bigger.
The age, weight, and height of your kids will make a big difference in terms of what you build.
After all, build something too big and too challenging, and your 5-year-old will lose interest and may feel bad about themselves for not being able to do it.
Build something too small and too easy, and your 10-year-old will be running back to their screens in no time flat.
So your 5-7-year-olds need to be challenged, but they won’t likely yet have the upper body strength for something like pull-ups (heck, some of us adults don’t either!)
Which are the best obstacles for 8 to 13-year-olds?
The best obstacles for 8-13-year-olds will include rope swings, climbing nets, and more challenging obstacles such as quad sets and even a small salmon ladder.
This age is where you can start to build really cool stuff. I would consider adding some, if not all, of the following:
- Rope swing
- Quad steps (where they jump from one triangle-shaped landing pad to another)
- Climbing wall net
- Ring toss climb (where they hold onto 2 rings and try and swing from peg to peg moving the rings as they go)
Of course for a real upper body challenge, go ahead and throw a salmon ladder into the mix too (that’s a verticle pull-up bar where they jump the bar up from level to level).
So below, we’ll get into some specifics about what to buy and how to build a backyard ninja warrior course.
General Questions
What is parkour?
Parkour, (sometimes called freerunning), is a type of urban gymnastics where practitioners run, jump, and climb on everyday objects found in cities such as concrete stairs, bike racks, picnic tables, and some take on more dangerous moves such as jumping from high buildings.
If you watch American Ninja Warrior, you often see many of the competitors mentioning parkour. Parkour is not a martial art, but it often looks like it.
At the martial arts school I helped run, we often incorporate parkour movements into some of the drills we do.
Essentially the person is in constant motion, flowing around obstacles and often in an urban setting. The movements are gymnastic, creative but efficient and you use the energy from one movement to flow into the next.
You see parkour athletes jumping off buildings, climbing up walls like Spider-Man, and doing other seemingly impossible things.
The best cinematic examples of parkour include:
- Stephen Amell in the TV show Arrow
- Casino Royale (the Daniel Craig version where he chases freerunning founder Sébastien Foucan)
- The Bourne Legacy
So if your kids want to learn parkour, that can really help them become masters of the backyard ninja warrior course you’re building. Just Google and see if there’s a parkour school near you.


What is American Ninja Warrior?
American Ninja Warrior is a TV show on NBC that began in December 2009 and began its 12th season in fall 2020. Contestants compete on a challenging and changing set of obstacles for prizes up to $1,000,000.
It’s based on a popular Japanese show called Sasuke which started in 1997.
In the US show, contestants compete against one another to complete a series of obstacles. With each obstacle, the course gets progressively harder.
While the show travels around the country, the national finals are held in Las Vegas.
If you aren’t sure what this looks like, check out my daughters and my favorite contestant Kacy Catanzaro, who was the 1st woman to qualify for the finals.
She started on the show in 2014 and moved on from it in 2017. She’s amazing!
Where is the American Ninja Warrior course?
American Ninja Warrior films in different cities across the country and the finals have been held in Las Vegas since season 4. Prior to that, the finals were held in Japan at the Sasuke finals course where the original show holds its finals.
Here is a list of cities the show has held courses in:
- Los Angeles
- Miami
- Dallas
- Denver
- Baltimore
- St. Louis
- Kansas City
- Houston
- Orlando
- Pittsburgh
- Atlanta
- Indianapolis
- Oklahoma City
- Philadelphia
- San Antonio
- Daytona Beach
- Cleveland
- Minneapolis
Final thoughts
In this post, we took an in-depth look into the world of homemade obstacle courses.
We explored a bit of the history behind the phenomenon of American Ninja Warrior as well as why and how you might want something like that in your own backyard to play with.
We also get into the costs. So if you’re ready to learn how to build a backyard ninja warrior course, you came to the right place.
What part of the course do you and your kids love the most? Who knows? Maybe they’ll be the next American Ninja Warrior champion!
If you like this post, please follow my Parenting board on Pinterest for more great tips from myself and top parenting experts!
Of course, I have to add that any time you build something that kids will be climbing, running, or jumping on you run the risk of injury. Following my ideas and plans that I have laid out here is in no way meant to imply low risk. Thus, you should follow and use my ideas and plans knowing there is risk involved. I am not liable for any injury and if you are concerned about injury or unsure of your ability to build something sturdy and safe, you should consult a professional in your area to assist.
Middle Class Dad is a participant in the Amazon Services LLC Associates Program, an affiliate advertising program designed to provide a means for sites to earn advertising fees by advertising and linking to Amazon.com. As an Amazon Associate, I may earn a small commission from qualifying purchases if you click to Amazon from my site and choose to make a purchase. This is no way increases the cost to you.
Photo credits that require attribution:
Kid Running the Obstacle Course by Matthew Bellemare is licensed by CC2.0
- Sagittarius Man & Gemini Woman Love and Sex Compatibility - January 31, 2024
- Taurus Ascendant Rising Personality Traits in Men (Guide) - January 31, 2024
- How to Seduce and Attract a Sagittarius Man (Seduction Tips) - January 31, 2024
eunice boeringa
Thursday 31st of December 2020
I found this to be really helpful in planning out a playground for our church. I especially appreciate the links to where to buy and prices. There is one thing that would be extra helpful to a grandma like me. That would be a couple of diagrams for good layouts. How much room is needed around various obstacles? Which flow nicely from one obstacle to another. I hate the idea of getting people to help with the layout, and then finding it doesn't quite work in the space. Or that there is wasted space that could have been used better. Any suggestions?
Jeff Campbell
Sunday 10th of January 2021
Hi Eunice
Thanks for the suggestion! As far as the room around the obstacles, the primary concern would be making sure that if someone fell off, they wouldn't hit their head on the next obstacle. As for the flow from one to another, to a degree that will depend on the age of the kids, but generally, you'd want to make it increasingly harder if they were doing it in series. So you could start with balance beams and/or the slackline, then the jungle gym and/or swings, have them climb the net wall, and then move to something more challenging like the quad steps, and end with the really challenging ones like a salmon ladder and/or warped wall.
Hope that helps!
Jeff