

Easter is a magical time in the Spring where kids and adults alike get creative. Get ready to dive into some fun with these 31 ideas for Easter egg art!
Whether you’re looking for simple techniques or creative themes, this list has something for every little artist. So grab your supplies and let’s make some colorful memories this Easter!
Ready to get started decorating?
I created a custom Amazon store of my all-time favorite Easter egg decorating and dyeing products and kits; everything you need to have fun, get creative, and knock out these ideas!
CLICK HERE to see it on Amazon.
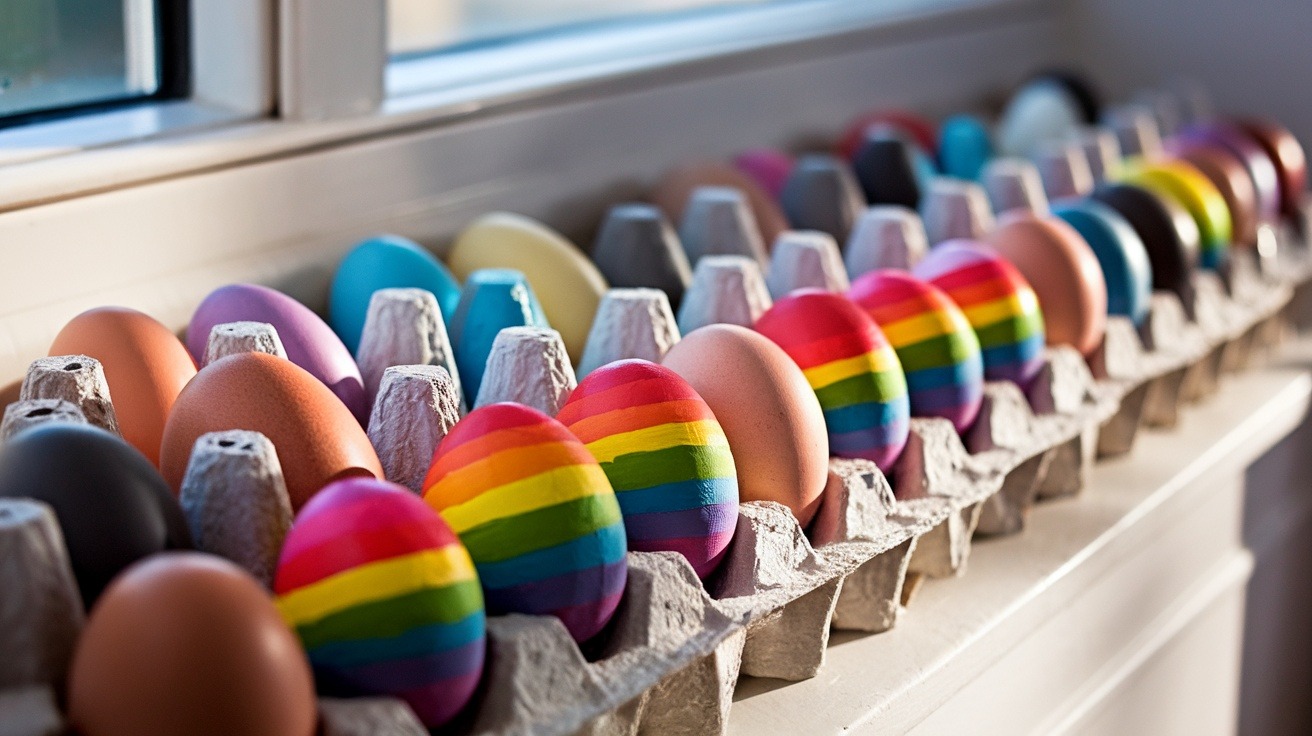
31 Fun Easter Egg Art Ideas
1. Nature-Inspired Egg Designs

Nature-inspired egg decorating is a fun way for kids of all ages to connect with spring. Using real eggs or plastic eggs, you can create beautiful designs with flowers and leaves.
To achieve a pressed flower look, brush a thin layer of mod podge or watered-down glue onto the egg, gently press the flower or leaf onto the surface, and seal with another layer of glue. For a natural dye transfer effect, wrap eggs in onion skins, hibiscus petals, or spinach leaves, secure them in a nylon stocking, and boil them in water with vinegar. When unwrapped, the plant imprints will leave a beautiful, earthy pattern.
This activity lets kids explore nature while making unique, organic Easter egg designs!
2. Glittery Galaxy Eggs

Transform your Easter eggs into a creative collection of easter art projects with glittery galaxy designs! Start by painting your eggs with black paint, and then let the kids go wild adding colorful dots and stars using chalk pastels or oil pastels.
The fun part is layering different colors and sparkles to create a space-like effect, making this an easy Easter egg craft for kids of all ages.
3. Sponge Painting Technique

Sponge painting is a fun way for kids of all ages to create colorful Easter eggs with a soft, textured look. Instead of using paintbrushes, kids can use sponges to dab watercolor or acrylic paint onto the egg surface.
Start by cutting a clean kitchen sponge or makeup sponge into small pieces. Dip the sponge into a shallow dish of paint and lightly blot it onto a paper towel to prevent excess dripping. Then, gently dab it onto the egg, layering different colors for a blended effect. For a bold contrast, add a final layer of black paint, dabbing lightly for a speckled look.
Allow eggs to dry on a wire rack or egg carton. The end result is a fun, textured effect that looks like tie-dye or soft clouds!
4. Marbled Eggs with Nail Polish

Marbled eggs using nail polish create stunning, swirling patterns with minimal effort. However, since nail polish has strong fumes, it’s best to do this activity outdoors or in a well-ventilated area.
Fill a disposable bowl with room-temperature water (cold water causes the polish to sink too fast). Add a few drops of different nail polish colors, then use a toothpick or skewer to swirl them into a marbled pattern. Quickly dip an egg into the water, rolling it gently so the polish adheres to the entire surface. Lift the egg out and let it dry on parchment paper.
For a glossy finish, spray with clear acrylic sealer once fully dry. Avoid eating these eggs, as nail polish is not food-safe—these are for display only!
5. Colorful Tie-Dye Easter Eggs

Creating colorful tie-dye Easter eggs is a fun way for kids of all ages to get creative.
Using simple materials like food coloring, water, and shaving cream, you can achieve vibrant spring colors that pop. This Easter art activity allows each child to express their unique style, making it an enjoyable experience for everyone involved.
6. Painted Storybook Characters

Painting storybook characters on Easter eggs is a fun way to bring beloved tales to life. Kids can turn eggs into their favorite book characters using acrylic paint, fine-tip paintbrushes, and paint pens for precise details.
Start by lightly sketching the character onto the egg with a pencil. Use acrylic paint or markers to fill in the design, letting each color dry before adding details. A black fine-tip marker works well for outlining features like eyes and facial expressions. For extra fun, cut and glue small pieces of felt, construction paper, or craft foam to add accessories like bunny ears, hats, or tiny capes.
With a little help from older children or parents, simple plastic eggs can become colorful, recognizable works of art!
7. Animal Faces on Eggs

Transform your Easter eggs into adorable animal faces with just a few simple materials. This fun craft is perfect for younger kids who love bunnies, chicks, or farm animals!
Start by coloring the egg using wax crayons or acrylic paint to create the base color (yellow for chicks, white for bunnies, etc.).
Use a black fine-tip marker or paint pen to draw eyes, a nose, and whiskers. Cut small ears, beaks, or tails from colored construction paper or felt, then attach them with a glue stick or double-sided tape.
For a fun twist, use googly eyes or pipe cleaners to add extra personality. Kids can mix and match different colors and features to create a whole farm of cute animal eggs!
8. Decoupage Egg Art

Decoupage egg art is a creative way to add intricate designs to Easter eggs using paper and glue. Younger kids can use tissue paper or magazine clippings, while older children can try layering watercolor-painted designs onto eggs for a more artistic look.
To start, cut small pieces of patterned napkins, newspaper, or colorful scrapbook paper. Use a foam brush to apply a thin layer of mod podge or watered-down glue onto the egg. Gently press the paper pieces onto the surface, smoothing out wrinkles as you go. Seal with another layer of mod podge and let dry completely.
For a more elegant look, try using gold leaf flakes or pressed dried flowers. This technique works on both real and plastic eggs and makes stunning Easter decorations!
9. Fabric Scrap Covered Eggs

Covering eggs with fabric scraps is a fun, textured way to create unique Easter decorations. This technique works best with thin cotton fabric or old patterned clothing.
Cut fabric into small squares or strips and apply a thin layer of white glue to the egg. Wrap the fabric pieces around the surface, overlapping them slightly. For a smooth, finished look, brush a final layer of mod podge over the fabric to seal everything in place.
If using lace or sheer fabric, try layering it over colored eggs for a vintage effect. This craft is a great way to repurpose old materials while making one-of-a-kind Easter eggs!
10. Rainbow Striped Eggs
Rainbow striped eggs are a fun way to add color to your Easter celebrations! Younger kids can easily create these using white glue and colorful paper or chalk pastels.
Simply paint straight lines or use a free printable egg template to guide them in their Easter egg craft adventures!
11. Chalkboard Paint Easter Eggs

Chalkboard paint Easter eggs offer a fun, reusable canvas for kids to decorate again and again. With a few simple materials, they can draw designs, write messages, and erase to start over!
Start by painting eggs with two to three thin coats of chalkboard paint from Amazon, letting each layer dry completely. If using real eggs, make sure they are blown out or hard-boiled first. Once dry, kids can use chalk or chalk pastels to create colorful patterns and designs. To make details stand out, dampen the chalk slightly before applying.
For extra fun, try using stencils or painter’s tape to create geometric designs. If you want to preserve the artwork, seal it with hairspray or a chalk fixative to prevent smudging. These eggs make fantastic decorations and can be wiped clean for a brand-new design anytime!
Ready to get started decorating?
I created a custom Amazon store of my all-time favorite Easter egg decorating and dyeing products and kits; everything you need to have fun, get creative, and knock out these ideas!
CLICK HERE to see it on Amazon.
12. Underwater Scene Eggs
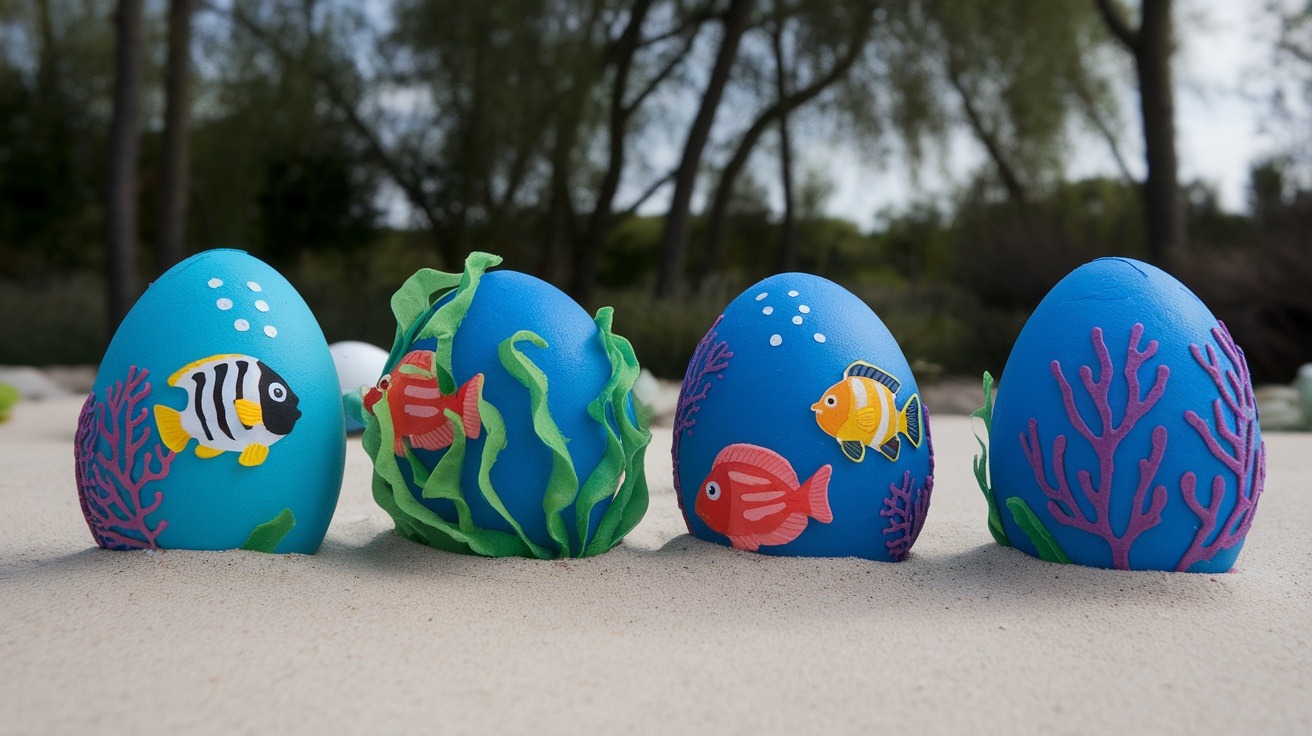
Underwater scene eggs bring the beauty of the ocean to your Easter celebrations! This craft is perfect for kids of all ages, allowing them to paint fish, coral, and waves onto their eggs.
For best results, use acrylic paint for bold colors or watercolors for a softer effect. Start by painting the base of the egg in shades of blue or turquoise to create a water-like background. Once dry, use fine-tip paintbrushes or paint pens to add fish, seaweed, bubbles, and coral details. For a shimmering touch, add metallic paint or glitter glue.
Younger kids can use stickers, sponges, or printable stencils to help with shapes. For a fun 3D effect, attach tiny seashells or craft foam cutouts. The finished eggs will look like miniature ocean worlds!
13. Glowing Easter Eggs

Creating glowing Easter eggs is a fun way to add a magical effect to your Easter crafts! These eggs shine under a black light, making them a unique addition to nighttime Easter activities.
To get started, coat eggs with glow-in-the-dark paint or fluorescent acrylic paint. Apply two to three layers, letting each dry completely. For an extra cool effect, use black glue to create outlines before painting—this makes details stand out when the egg glows.
Once dry, place the eggs on a cookie sheet under a black light to see them glow. For an interactive twist, hide glowing eggs for an exciting nighttime Easter egg hunt! If using real eggs, note that the paint makes them for display only, not edible.
14. 3D Textured Eggs

3D textured eggs add a new level of creativity to Easter decorating! This craft lets kids explore different materials like yarn, tissue paper, or textured paint to create a unique look.
Start by coating the egg with a thin layer of white glue or mod podge. For a yarn-wrapped effect, wind colorful yarn around the egg, pressing gently as you go. If using tissue paper, crumple it up first for extra texture before attaching. Let each layer dry before adding more.
For a fun extra touch, try creating raised designs using puffy paint or dimensional fabric paint. Once dry, eggs can be left as-is or painted over for a more polished look. These textured eggs make great centerpiece decorations!
15. Foil-Stamped Egg Art

Foil-stamped egg art adds a metallic shine to your Easter decorations, making eggs look like tiny pieces of artwork! This technique is simple but produces stunning results.
Start by coating the egg with a thin layer of glue or mod podge. Let it dry for about 30 seconds until tacky, then gently press a foil transfer sheet or small pieces of gold leaf onto the surface. Rub lightly with a soft cloth or brush to help the foil adhere. Peel away the excess to reveal a shimmering design.
For more intricate patterns, use double-sided tape or stencils to create geometric shapes before applying foil. If sealing, use a clear spray or a final layer of mod podge to keep the design intact. These shiny eggs make elegant decorations for Easter baskets!
16. Pasta Decorated Eggs

Pasta-decorated eggs are a fun, textured craft that turns simple materials into beautiful Easter art. Kids can create different patterns using pasta shapes like macaroni, orzo, or bowties!
To begin, paint the eggs with a base color and let them dry completely. Arrange pasta pieces into designs like flowers, spirals, or geometric patterns. Use white glue for a strong hold or hot glue for a quicker bond. Once dry, paint over the pasta to blend it with the egg or leave it natural for a fun texture contrast.
For an extra festive touch, try spray-painting the pasta gold or silver before attaching it. This craft is a great way for kids to get creative while using simple pantry staples!
17. Fairy Tale Castle Eggs

Fairy tale castle eggs bring magical kingdoms to life! With a little paint and creativity, kids can turn plain eggs into mini enchanted castles.
Start by painting the egg with a base coat of pastel or metallic watercolor paint. Once dry, use wax crayons to draw castle details like windows, turrets, and doors—when painted over, the crayon resists the watercolor, making details stand out.
To add a 3D effect, cut out paper or felt turrets and glue them onto the egg. For a final touch, sprinkle fine glitter over mod podge to create a sparkling castle look. These eggs are perfect for fairy tale lovers and magical Easter displays!
18. Printed Photos on Eggs

Printing photos on Easter eggs is a unique and sentimental way to decorate! This craft lets kids create personal keepsakes using family pictures or favorite images.
The easiest method is using waterslide decal paper from Amazon. Print the image onto the decal paper, trim it, and soak it in water for a few seconds. Slide the decal onto the egg, smooth out any bubbles, and let it dry.
If decal paper isn’t available, try the tissue paper transfer method:
Print images onto thin white printable tissue paper from Amazon, cut them out, and attach them to the egg with a thin layer of mod podge. Seal with another layer to protect the design. These eggs make beautiful, personalized Easter decorations!
19. Scratch Art Easter Eggs

Scratch art Easter eggs combine painting and hidden surprises in one fun craft! This technique allows kids to etch colorful patterns into a black surface, revealing a rainbow effect underneath.
First, paint the egg in bright colors (pink, blue, yellow, green) and let it dry completely. Next, cover it with a thick layer of black acrylic paint mixed with dish soap (1:1 ratio). Once dry, use a toothpick, skewer, or old gift card to scratch away designs like swirls, zigzags, or hearts.
The more colors underneath, the more exciting the final effect! This craft brings the magic of scratch-off art to Easter egg decorating.
20. Henna-Inspired Egg Designs

Henna-inspired eggs turn simple Easter decorations into intricate works of art! These eggs mimic traditional henna patterns with delicate swirls, dots, and floral designs.
Use black glue or a fine-tip paint pen to draw detailed designs onto a dry egg. Let it dry completely before adding a final coat of clear coat or mod podge to protect the artwork. To mimic real henna, try using brown or gold metallic paint instead of black.
For added depth, combine raised black glue outlines with contrasting painted details. This craft is great for kids who enjoy drawing fine details and experimenting with elegant patterns!
21. Lace and Doily Egg Art

Lace and doily egg art adds a delicate, vintage touch to Easter decorating. The intricate patterns make eggs look beautifully detailed with minimal effort.
Cut pieces of lace fabric or paper doilies to fit the egg’s surface. Using mod podge or double-sided tape, press the lace onto the egg, smoothing it down gently. If painting over, let it dry before carefully peeling away to reveal a stenciled effect.
For a classy finish, lightly brush the egg with gold or pastel paint to enhance the texture. These eggs make stunning centerpieces and elegant gifts!
22. Stenciled Pattern Eggs

Stenciled pattern eggs are a fun way for kids to create clean, intricate designs with minimal effort. Using a free printable easter egg stencil or craft store templates, children can experiment with different colors and techniques for a unique Easter look.
Start by securing a stencil onto the egg with painter’s tape or light adhesive spray to prevent smudging. For best results, use a sponge or a stencil brush to dab acrylic paint over the cut-out areas. Watercolors can also be used for a softer effect, but let the stencil dry in place before removing it carefully.
For a wax resist effect, trace patterns onto the egg with an oil pastel or white crayon before painting over with watercolor. The waxed areas will repel the paint, revealing beautiful designs. Let dry, and enjoy the crisp, colorful patterns!
23. Animal Print Eggs

Animal print eggs bring a touch of the wild to your Easter decorations! Kids can create patterns inspired by zebras, leopards, giraffes, cows, or even snakes using just a few simple materials.
Start by painting the egg with a base color—white for zebra or cow prints, tan for leopard spots, and yellow for giraffe patterns. Once dry, use a fine paintbrush, black marker, or stamp technique to add spots or stripes. Sponge-dabbing works well for more natural, blended patterns.
For a 3D effect, add tiny dots of puffy paint to give leopard spots texture, or glue thin strips of black felt or paper for raised zebra stripes. The final result is a fun, eye-catching set of animal-inspired Easter eggs!
24. Balloon Dipped Eggs

Balloon-dipped eggs create a marbled, textured effect using an unexpected tool—balloons! This craft is a fun way to achieve colorful, abstract patterns on Easter eggs.
To start, blow up a small balloon just big enough to fit comfortably in your hand. Pour watered-down acrylic paint or liquid watercolors onto a plate. Gently dip the balloon into the paint, then lightly press it onto the egg, rolling it slightly to create a splattered or marbled look.
Let each layer dry before adding more colors to avoid muddy blending. You can also use glitter paint or metallic accents for extra flair. This technique is perfect for creating artistic, one-of-a-kind eggs!
25. Watercolor Technique Eggs

Watercolor eggs bring a soft, artistic look to Easter decorations! Using watercolor paints and simple resist techniques, kids can create stunning, one-of-a-kind designs.
For best results, lightly dampen the egg before painting to help colors blend smoothly. Apply watercolor in layers, letting each dry before adding more. To create patterns or designs, draw with a white crayon or glue before painting—the wax or glue will resist the paint, leaving a crisp outline.
For added texture, sprinkle salt onto wet watercolor paint—as it dries, it creates a unique, speckled effect. Once the eggs are dry, seal with a thin layer of mod podge for a glossy finish. These soft, dreamy eggs are perfect for an elegant Easter display!
26. Mosaic Tile Eggs

Mosaic tile eggs add a colorful, textured look to Easter crafting! This fun technique mimics real mosaic art by arranging small, colorful pieces onto an egg’s surface.
Cut colored paper, magazine clippings, tissue paper, or old gift cards into small, tile-like shapes. Arrange the pieces first to plan your design. Use a thin layer of white glue or mod podge to attach each tile to the egg, pressing down gently.
For a more textured look, use tiny eggshell fragments or small craft foam pieces instead of paper. Once dry, seal the entire egg with a top coat of mod podge for a glossy, polished effect. These eggs make stunning Easter decorations with a handcrafted, artistic touch!
27. Woodland Creature Eggs

Transform Easter eggs into adorable woodland creatures with simple materials and a little creativity! Kids can design foxes, owls, deer, hedgehogs, or raccoons for a nature-inspired Easter craft.
Start by painting the eggs in natural tones—orange for foxes, brown for owls, and gray for raccoons. Once dry, use a fine paintbrush or marker to add details like whiskers, eyes, and fur patterns. Wax crayons work well to create a resist effect when painting over for subtle textures.
For a 3D effect, cut out and attach small ears, antlers, or tails using felt or construction paper. Add a touch of glitter or metallic paint to make your woodland creatures truly magical!
28. Color-Changing Eggs

Color-changing Easter eggs add a magical, interactive element to Easter celebrations! These eggs shift shades when exposed to heat, UV light, or layered paint techniques.
To create heat-sensitive eggs, use thermochromic paint from Amazon, which reacts to warmth—when held in hand, the egg changes color! For sun-sensitive eggs, coat them in UV-reactive paint, which deepens in color when taken outside.
For a layered paint reveal, apply black glue to outline shapes or patterns on the egg. Once dry, paint over with watercolors or chalk pastels—the black glue resists the color, revealing the designs underneath. This interactive craft is perfect for kids who love a little Easter magic!
29. Dinosaur Egg Designs

Dinosaur egg designs bring a prehistoric twist to Easter decorating! These eggs can be made to look like fossilized dino eggs or vibrant, scaly dinosaur skins.
For a realistic fossil effect, paint the egg in earthy browns and grays, then use a sponge to dab on textured layers. Add small cracks with a fine-tip marker for an aged look. For dino-scale eggs, paint in bright greens, blues, and oranges, then use a dry brush to add dark spots or stripes.
For a fun 3D effect, coat the egg in mod podge and sprinkle with fine sand for a rough, ancient texture. These eggs make a roaring addition to any Easter basket!
30. Whimsical Tie-Dye Easter Eggs

Tie-dye Easter eggs create vibrant, swirling color patterns using an easy, mess-free method! This project is perfect for kids who love surprises, as each egg turns out uniquely beautiful.
Fill a shallow tray with shaving cream or whipped cream, then add drops of food coloring in multiple shades. Use a toothpick or skewer to swirl the colors into fun patterns. Roll the egg gently through the mixture, coating it completely. Let sit for 10-15 minutes before wiping off excess shaving cream with a paper towel.
To prevent colors from getting muddy, use only 2-3 shades at a time and avoid over-mixing. The result? Stunning, marbled Easter eggs that look like tiny works of art!
31. Stained Glass Easter Eggs

Stained glass Easter eggs create a beautiful, colorful effect that mimics real stained glass windows. This craft is perfect for kids who love bright colors and bold designs!
Start by painting the egg completely black using acrylic paint or black glue. Once dry, use a fine-tip paintbrush, metallic markers, or puffy paint to draw a lead-like framework—this will mimic the outlines in stained glass. Then, fill in the spaces with translucent paint or tissue paper pieces sealed with mod podge to create the illusion of light shining through.
For an extra touch, brush the egg with a thin layer of glossy varnish to make it shine like real stained glass. These eggs look stunning displayed near a light source, bringing a colorful glow to your Easter decor!
Final Thoughts
These Easter egg art projects bring creativity and joy to a beloved springtime tradition. From delicate Ukrainian Easter egg designs to simple watercolor techniques, there’s something here for kids of all ages and skill levels.
Don’t forget that process art is just as valuable as the finished product. The journey of creating on an egg shape teaches patience and fine motor skills while making memories.
Many of these ideas work on paper eggs too, using free printable Easter egg templates for those who prefer a flat surface. This option works especially well for younger children who might struggle with real eggs.
Remember to prepare your workspace before starting. Cover tables with tin foil or newspaper, have glue bottles ready, and gather all materials in advance.
The most important thing is having fun together. These projects create opportunities for conversation, laughter, and creative expression – making Easter memories that last much longer than chocolate bunnies!
Ready to get started decorating?
I created a custom Amazon store of my all-time favorite Easter egg decorating and dyeing products and kits; everything you need to have fun, get creative, and knock out these ideas!
CLICK HERE to see it on Amazon.
Middle Class Dad is a participant in the Amazon Services LLC Associates Program, an affiliate advertising program designed to provide a means for sites to earn advertising fees by advertising and linking to Amazon.com. As an Amazon Associate, I may earn a small commission from qualifying purchases if you click to Amazon from my site and choose to make a purchase. This is no way increases the cost to you.
- 201 Great Father’s Day Quotes to Inspire and Empower Him - May 12, 2026
- 179 Happy Mother’s Day Quotes for Mom in 2026 - April 20, 2026
- 17 Simple Leprechaun Trap Ideas Your Kids Will Love! - January 19, 2026